Build your first app
By the end of this tutorial you'll have a small CRM with three tables (company,
contact, deal), a list-and-detail page for each, a Business Event that
auto-stamps the deal's updated_at, and a Script Module that recalculates the
company's total open-deal value whenever a deal changes. Every concept from
Core concepts shows up at least once.
It assumes you've finished Getting started and you have an open Archestack environment in another tab. Total time: about 45 minutes if you read carefully, 25 if you skim.
Conventions used here: table and column names are snake_case (the platform
hints at this convention in the Schema Designer's "Table name" field). Code samples use the
real Db API, see Reference → Script-callable
APIs for the full surface.
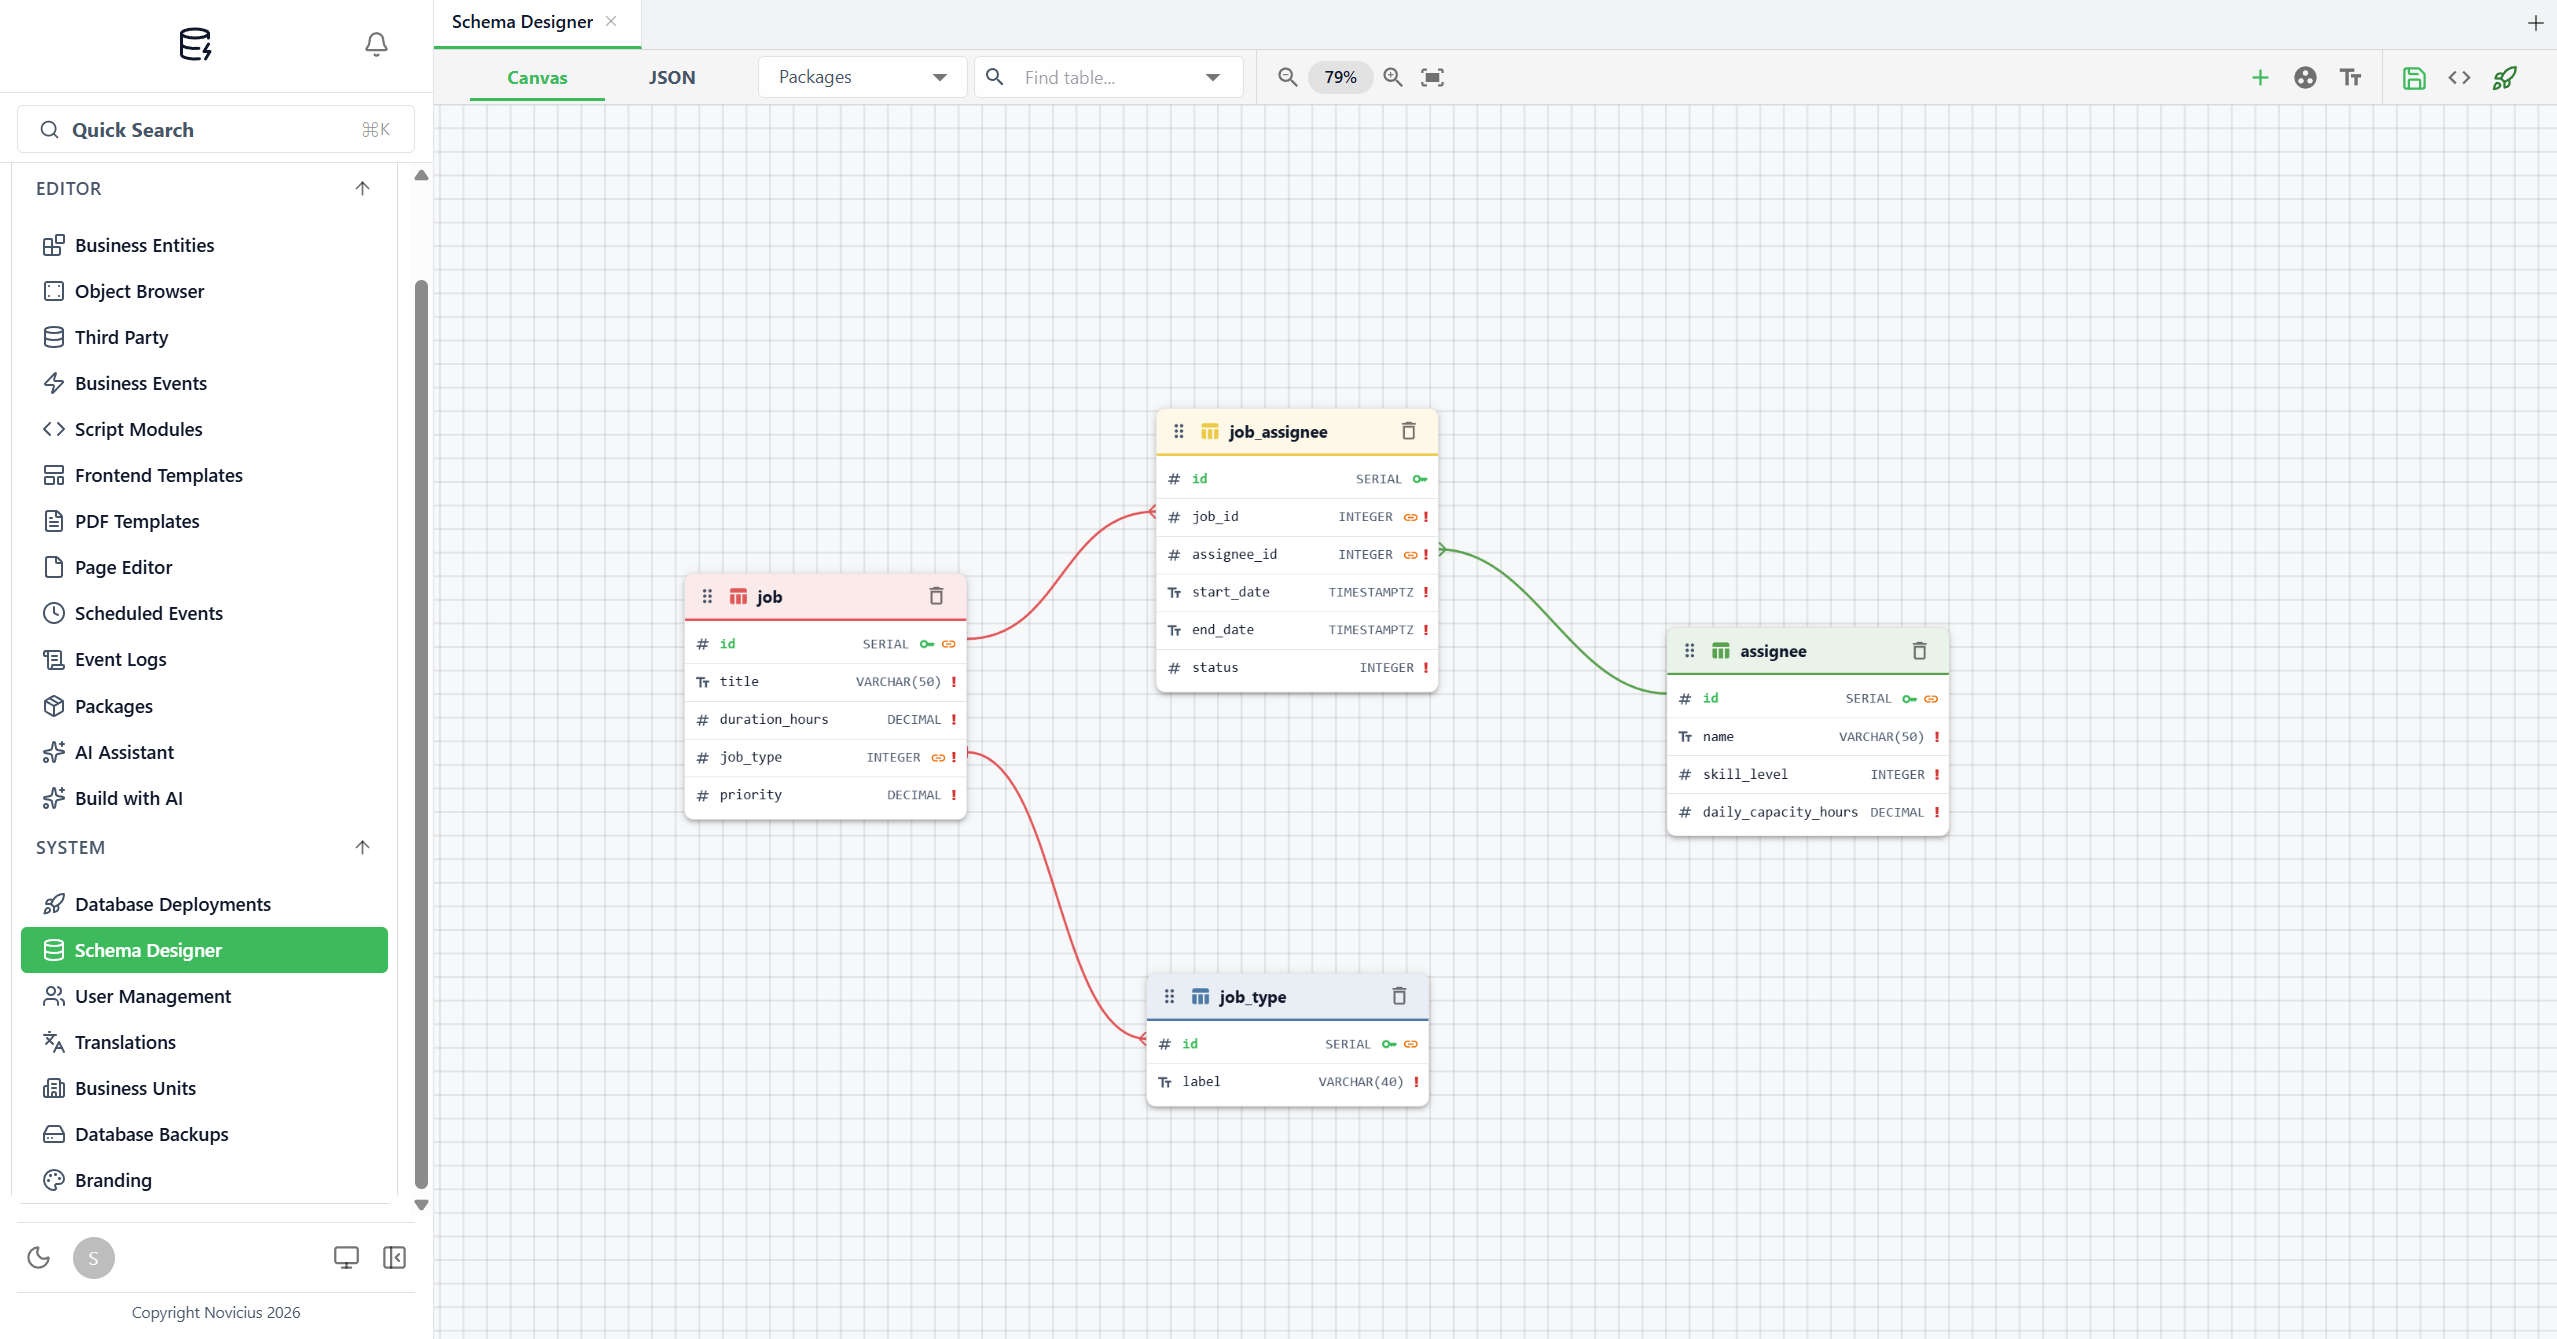
Step 1 - Design the schema (10 min)
Open Schema Designer and add three tables.
For each table: click Add Table in the toolbar, type the name in the dialog's
"Table name" field, click Create. The new table appears on the canvas with an
auto-generated id SERIAL primary key (locked). The right panel opens on the
Columns tab, add additional columns from the dashed-border "Add column" box at the bottom.
Click each column to expand it and tweak the toggles (PK / NULL / UQ), the Length, and the
Default value.
Table: company
id· SERIAL, PK (auto)name· VARCHAR(200), requiredindustry· VARCHAR(80), nullableopen_deal_value· DECIMAL, default0- kept in sync via the script in Step 5created_at· TIMESTAMPTZ, defaultnow()
Table: contact
id· SERIAL, PK (auto)first_name,last_name· VARCHAR(100), requiredemail· VARCHAR(200), required, UQ oncompany_id· INTEGER, required - foreign key, set up next
Table: deal
id· SERIAL, PK (auto)company_id· INTEGER, required - foreign key, set up nexttitle· VARCHAR(200), requiredstage· VARCHAR(40), required, default'New'- values: New, Qualified, Proposal, Won, Lostamount· DECIMAL, required, default0created_at,updated_at· TIMESTAMPTZ, defaultnow()
Foreign keys
Foreign keys live in the Relations tab of the right panel. Select the
contact table, switch to Relations, scroll to the "Add relationship" section:
- FK column (on this table) =
company_id - Relation type =
One-to-Many - References → table =
company - References → column =
id - Click Add Relationship.
Repeat for the deal table (its company_id → company.id).
company / contact / deal setup will look the same shape with two FK lines pointing at company.)Deploy
Click Deploy in the Schema Designer toolbar. You land on the deployment
config page. Switch to the Generated SQL tab, you should see three
CREATE TABLE statements plus the FK constraints. Click Deploy at
the top right.
What you'll see if it works: the deployment row in Database Deployments → Overview goes from "Executing" to "Succeeded" within a few seconds. The three tables appear in Object Browser's table list.
If the deploy fails on FK constraints: the Generated SQL emits tables in the order they were saved. Open the SQL tab and reorder socompanyis created beforecontactanddeal, then redeploy. Or click Regenerate after manually reordering tables in the Schema Designer canvas.
Step 2 - Compose the Business Entities (10 min)
Each page needs a Business Entity to bind to. Open Business Entities and click Create for each one. Hit Run Preview after each save to confirm the columns come back correctly.
BE: company
Entity Name company, Master Table company, Label Column
name. Save.
Click Add Join twice to add two aggregated joins:
-
Join to
contact: From columncompany.id, To columncontact.company_id. Toggle Aggregate Mode on. Pick columnid, set Aggregate Function =COUNT, name itcontact_count. -
Join to
deal: From columncompany.id, To columndeal.company_id. Aggregate Mode on. Pick columnid, functionCOUNT, name itopen_deal_count. (We'll filter to "open" deals via a Business Event in Step 5; for now this counts all deals.)
BE: contact
Entity Name contact, Master Table contact, Label Column
email. Add a Join to company via
contact.company_id → company.id, surface the name column as
company_name. (Don't enable Aggregate Mode here, it's a normal join.)
BE: deal
Entity Name deal, Master Table deal, Label Column
title. Add a Join to company via
deal.company_id → company.id, surface the name column as
company_name.
Verify: on each BE, click Run Preview. You'll see an empty grid (no data yet) with the column headers you defined. If a join column header is missing, you probably forgot to tick the column in the join's column picker. Re-open the join, tick the column, save, run preview again.
Step 3 - Build the pages (10 min)
Open Page Editor. For each Business Entity, click Create:
- Companies - Page Name
Companies, Page Route/companies, Business Entitycompany. The Visual tab auto-generates a list and a detail form. In the detail form, click Add Tab twice to add Contacts and Deals tabs. In each tab, add a RelatedGrid section bound to the contact / deal BE with the join filter set to company.id = current record's id. - Contacts - Page Name
Contacts, Page Route/contacts, Business Entitycontact. The auto-generated detail form'scompany_idfield will appear as a number, change its Type to Select and set the Entity autocomplete tocompanyso users pick a company by name. - Deals - Page Name
Deals, Page Route/deals, Business Entitydeal. Same treatment forcompany_id(TypeSelect, Entitycompany). Forstage, leave Type asTextfor now, the values can be enforced via aValidateevent later if you want.
For each page, flip the Published switch in the top header to ON. The pages
appear in the sidebar under an APPLICATION section (grouped by category). Add
a Company, then a Contact tied to that Company, then a Deal, confirm the relationships render
correctly. The Companies page should now show 1 in contact_count.
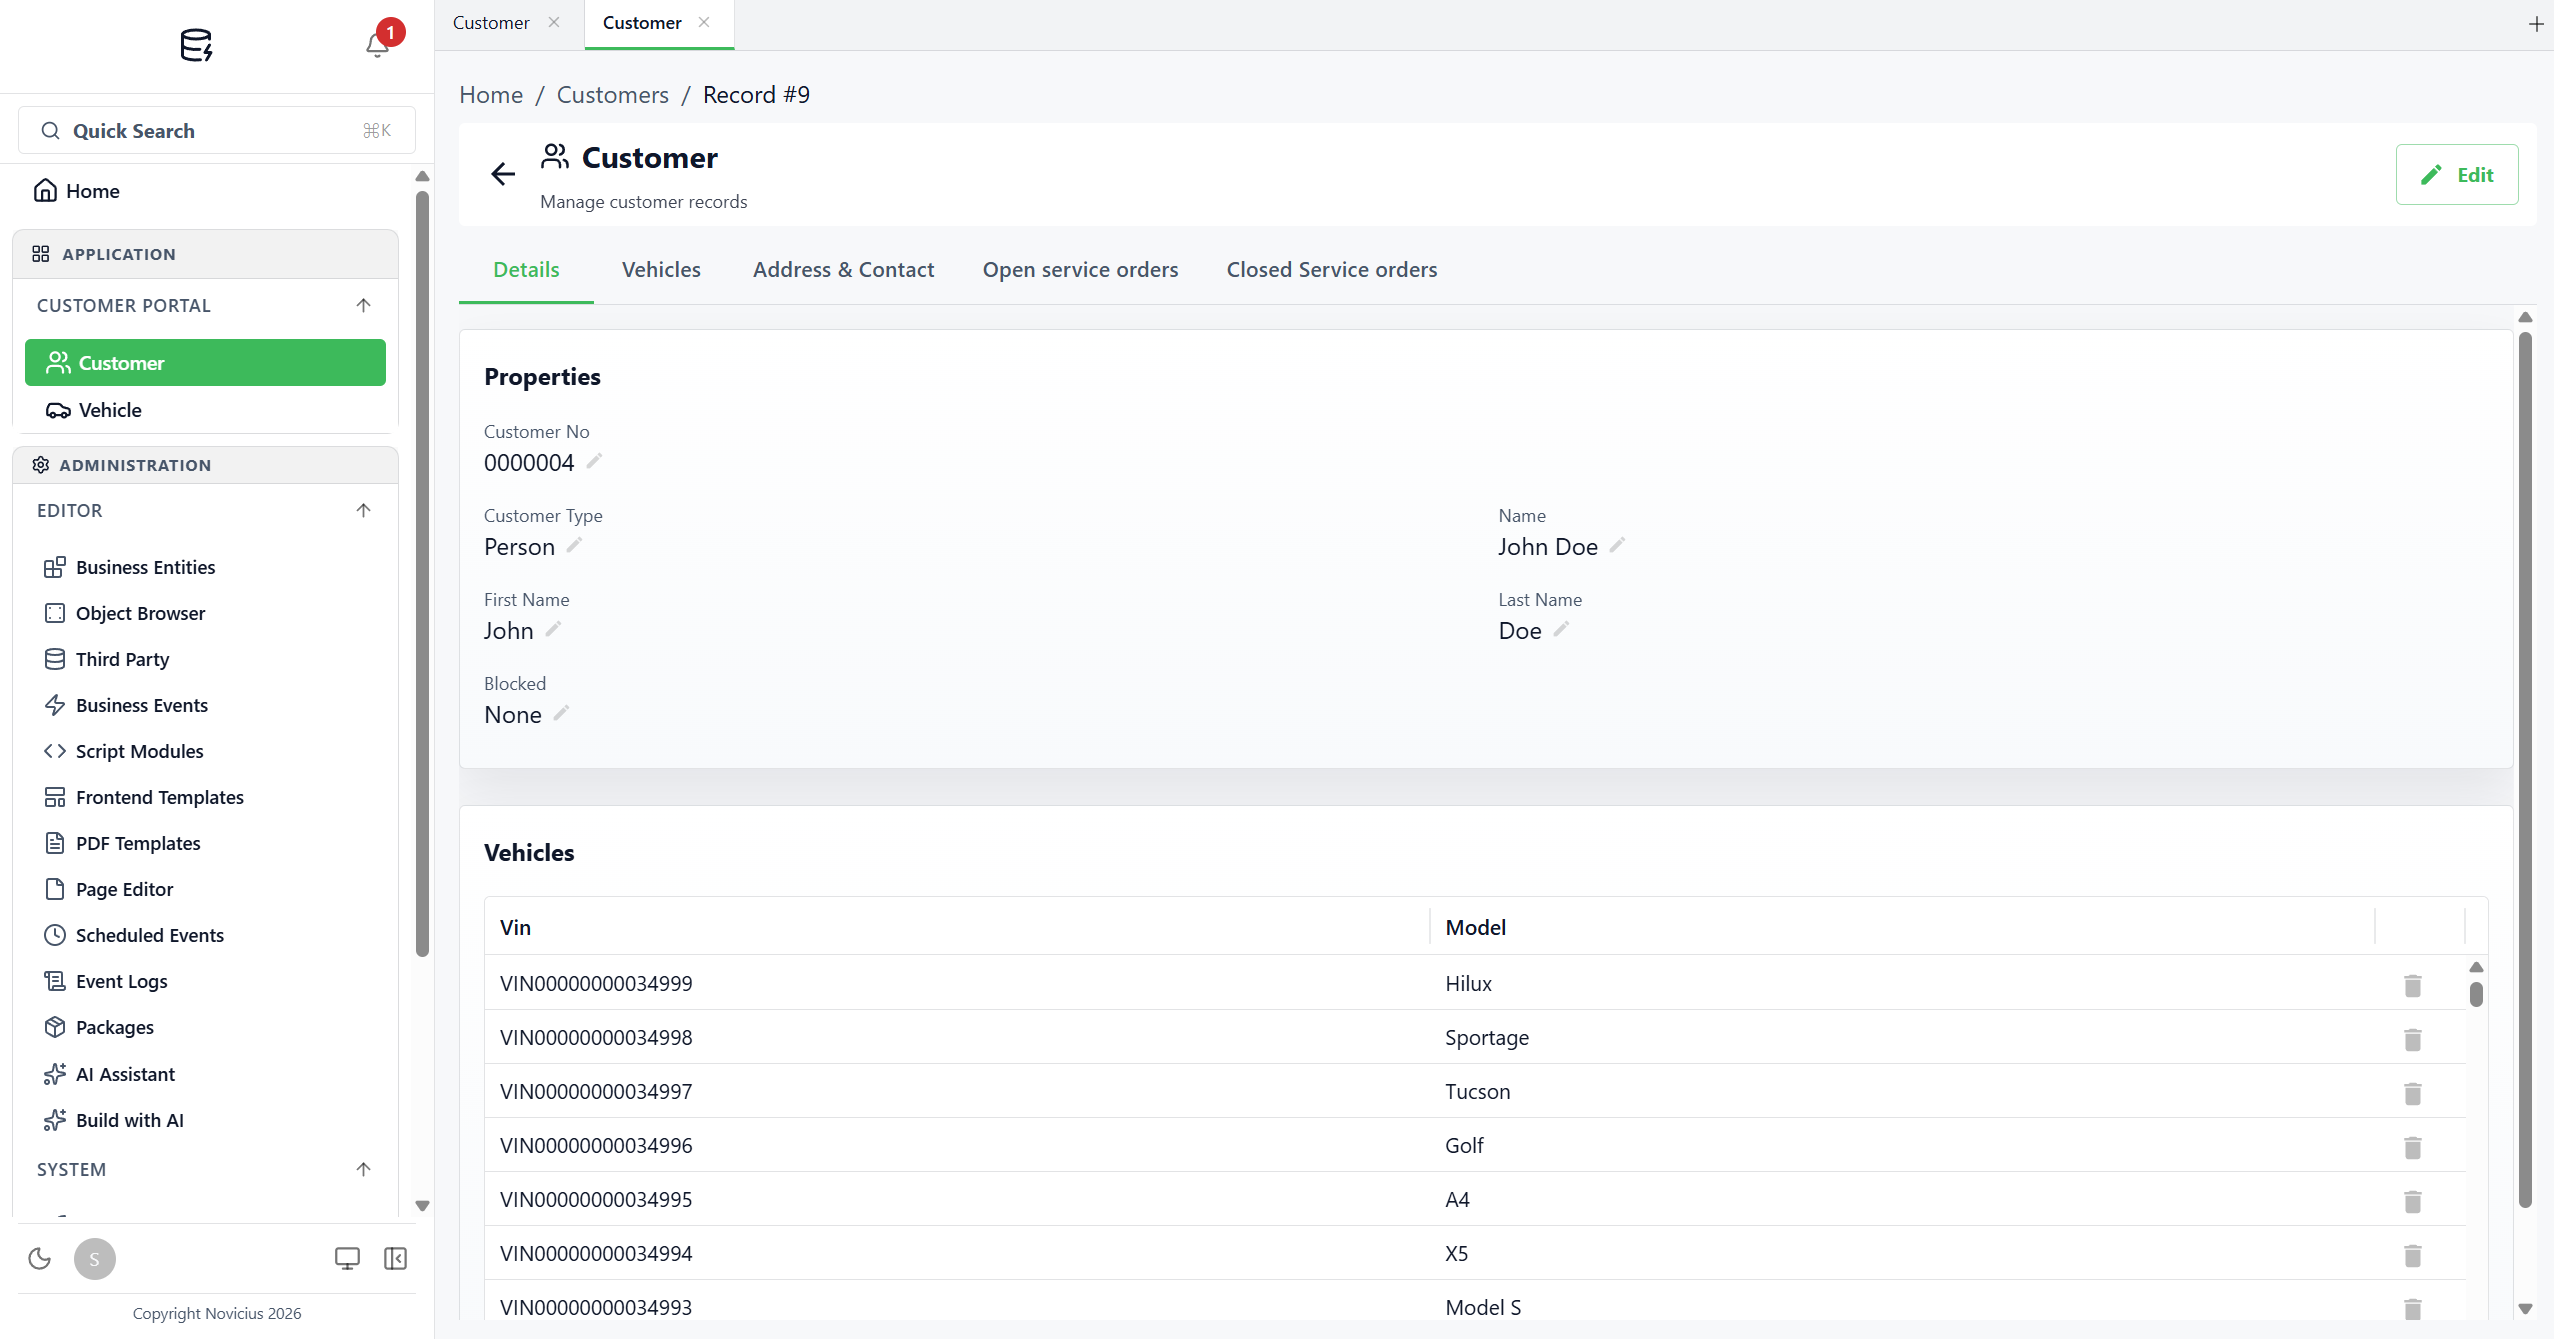
company page will produce. Note: the sidebar's APPLICATION section appears as soon as you publish, pages are grouped under a category header (here: CUSTOMER PORTAL). The detail panel renders breadcrumbs, an Edit button (top-right), per-field pencil icons for inline edits, additional tabs across the top (Details / Vehicles / etc.), and below the form a related-grid section pulling rows from another BE filtered by the current record. The bell badge ("1") shows there's an unread Event Log failure. If something looks empty: the most common cause is forgetting to flip the
Published switch, if it's OFF, navigating to /companies in the sidebar shows
nothing. Switch it ON and refresh.
Step 4 - Clean up a field on save with a Business Event (5 min)
Business Events run a little logic whenever a record is written. The smallest useful one: trim
stray whitespace from a deal's title on every save, so " Acme renewal "
lands as "Acme renewal". Let's wire that up.
You never need a rule forcreated_at/updated_at/created_by/updated_by. Archestack adds those four audit columns to every table and stamps them on every insert and update automatically, so a "stamp updated_at" trigger would just duplicate work the platform already does.
- Open Business Events → Create.
- Rule Name:
Normalize deal.title. Toggle Enabled ON. - Business Entity:
deal. Triggers: tick Before Update. - No conditions, fire on every update.
-
Add an action: pick Execute Script. The action's script body:
string title = Entity.title; Entity.title = title?.Trim(); -
Click the Simulate tab → pick any existing Deal → click Run
Simulation. The output panel shows the script ran successfully and what
Entity.titlewas set to. (No real write happens, simulation runs in a rolled-back transaction.) - Save. Test by editing a Deal whose title has leading or trailing spaces, the title should come back trimmed on each save.
Why Before Update + Execute Script instead of an action that "sets a
field"? Archestack doesn't have a discrete "Set field" action. The way you mutate
a record from a trigger is to assign to Entity.column_name inside an
Execute Script on a Before* timing. The platform persists the modified Entity back as
part of the in-flight write, no extra query, no recursion risk.
Step 5 - Recalculate company.open_deal_value with a Script Module (10 min)
A computed total like "open deal value per company" is too dynamic for a stored column to stay accurate by hand. We'll keep it in sync with a small script that re-runs whenever any deal on a company is inserted, updated, or deleted.
Write the script
Open Script Modules → Create. Name it
RecalcCompanyOpenDealValue.
Switch to the Parameters tab. Click Add. Name
company_id, Type int, Required ticked.
Back to the Edit tab. Body:
var openDeals = await Db.From("deal")
    .Where("company_id", "=", company_id)
    .Where("stage", "!=", "Won")
    .Where("stage", "!=", "Lost")
    .ToListAsync();

decimal total = 0;
foreach (var d in openDeals) total += (decimal)(d.amount ?? 0);

await Db.UpdateAsync("company", company_id, new { open_deal_value = total });

return total;
Switch to the Test tab. Type a real company_id from your
Companies page in the parameter input, click Run. The output shows the
return value (the total) and a success indicator. Reload the Companies page,
open_deal_value on that company is now in sync.
Common stumbles:
- Forgetting
awaiton.ToListAsync(), the script compiles butopenDealsends up holding aTask, not the rows. The error in the Test panel will mention "cannot be enumerated".- Using
Db.Queryinstead ofDb.From, there's noQuerymethod. Stick toDb.From(table)for chained queries andDb.GetAsync(table, id)for single-row-by-PK.- Trying
.SumAsync(...), doesn't exist. Fetch + sum in C#, as above.
Wire it to a Business Event
- Open Business Events → Create.
- Rule Name:
Recalc company.open_deal_value on deal change. Enabled ON. - Business Entity:
deal. Triggers: tick After Create, After Update, and Before Delete. - No conditions, fire on every change.
-
Add an action: Execute Script. Body:
var entity = OldEntity != null && OldEntity.company_id != null ? OldEntity // for delete & update, OldEntity has the original company_id : Entity; // for create, only Entity is populated await Modules.CallAsync("RecalcCompanyOpenDealValue", new Dictionary<string, object?> { ["company_id"] = entity.company_id }); - Save. Edit a Deal's
amountand reload the Company page, the total stays in sync.
Why call it through Modules instead of inlining the logic in this trigger's script? Two reasons. First, the recompute is reusable, you can also call it from a Scheduled Event (nightly catch-up) or directly from the front end. Second, it isolates the logic in a single named place, easier to test, easier to find later.
Step 6 - Bundle it as a package (5 min)
You've built a real, working mini-CRM. Bundle it so you can move it to another environment.
- Open Packages → Create. Name it
MiniCRM v1. - Add the three Pages. Open the linked-items panel to see the cascade: the package will pull in the BEs the pages reference, the source tables those BEs read from, plus the two Business Events and the Script Module that touch them.
- Untick anything you'd rather omit, typically you'd keep everything for a tutorial like this.
- Click Export → download the ZIP.
Importing the ZIP into a different environment recreates everything (assuming the schema is deployed first). That's how partners ship vertical-specific configurations and how you'd promote work from a trial to a paid environment later on.
Recap - what just happened
- You designed a schema, deployed it as real PostgreSQL tables, and never wrote any SQL by hand.
- You exposed those tables through Business Entities, choosing what to surface, joining in labels for usability, aggregating related-row counts.
- You composed three pages from configuration alone, with embedded tabs and search.
- You added a behaviour with a Business Event (auto-stamping) and a more complex calculation with a Script Module, eight lines of C# that runs every time the data changes.
- You bundled the whole thing as a Package, portable across environments.
The same loop scales to dozens of tables and hundreds of pages. The Reference covers the rest of the platform, branding, third-party data sync, AI-assisted scaffolding, but the core skill is what you just learned.
Where to go next
- Generate PDF invoices - add a printable invoice template to the Deals you just built. Same data, new output channel.
- Scheduled Events - extend the recompute script with a nightly catch-up that runs without user action.
- AI Builder - point it at "add support for service appointments, date, customer, vehicle, status" and watch it scaffold a similar feature.